
These tips are for general backcountry terrain, such as tramping, ski touring, or approach/exit routes on climbing trips. If you’re climbing or skiing steep terrain, beta and route descriptions are the name of the game and that map won’t help much.
Remember that 98% of navigation in the NZ mountains is about relating the landscape to the contour lines on the map, not about your compass. However, your compass can still allow you to get through some situations without having to resort to frequent references to your phone.
Figuring out how much distance you’ve covered (or how much height you’ve gained):
Counting steps or rope lengths can work, but you need to be constantly keeping track of your total. By estimating your pace instead, and calculating the time required for that leg, you free up a lot of mental space for other things. You can always adjust your calculation part-way through that leg if your pace ends up being different to what you’d assumed. Estimating distance visually on the map, using the 1km grid lines as a reference, will be accurate enough.
If you don’t want the pressure of making such calculations, use this pacing table:
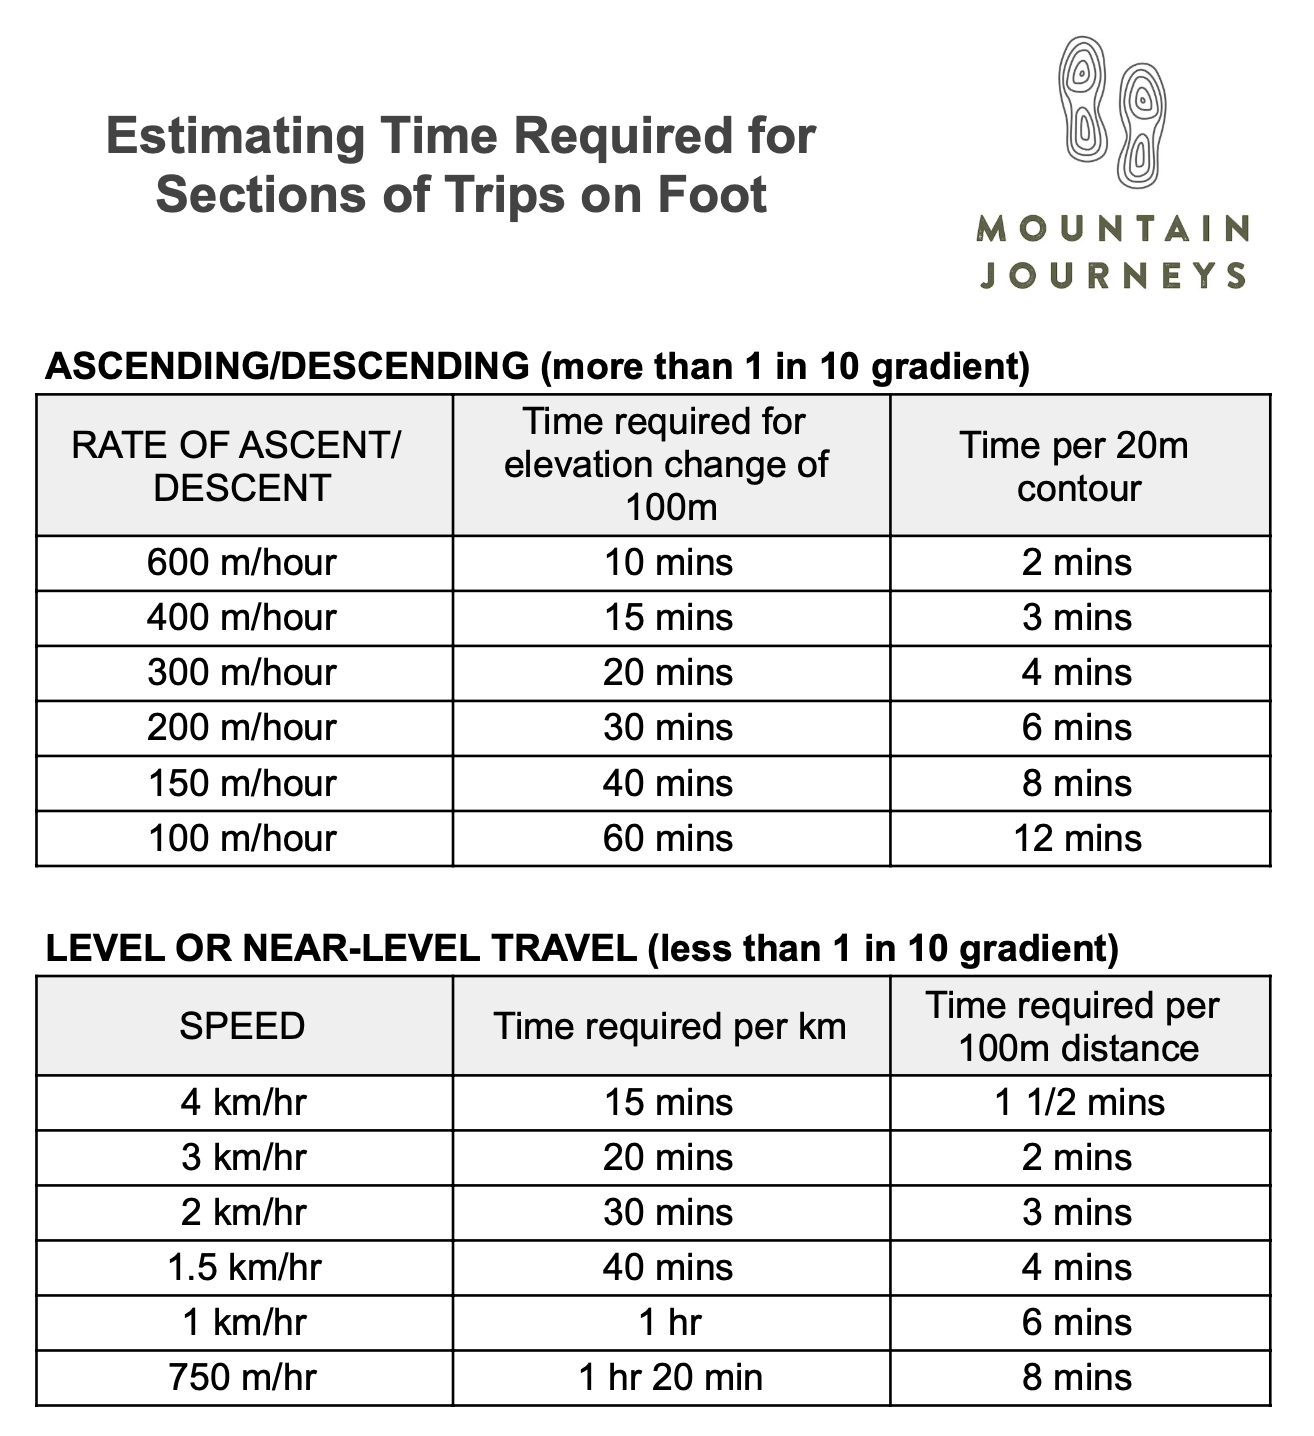
You can use the above method to work out how long a certain leg will probably take, reducing the frequency of checking your phone for your position.
Bearings/Compasses
From a known location, estimating the bearing you need to travel on to within 5-10 degrees is accurate enough. Terrain and other human errors will swing you around anyway, so trying to be more accurate is unnecessary.
A nice round 20 degree correction for magnetic declination is close enough in New Zealand. If you always point your red needle at 20 (white needle at 200) then you’ll never need to do any addition or subtraction, and every bearing will be a True/Grid bearing; i.e. there’s no need to refer to a Magnetic bearing. (If you prefer to take off 20 degrees to follow a magnetic bearing, go for it, just remember to refer to the True bearing when communicating with others about your route.)
It’s great if you have someone walking a few metres in front so you can keep them on the correct bearing, but if leading from the front, first pick a feature that lines up with your bearing (if possible). Most people drift slightly left or right without knowing it when trying to follow a bearing without anything in front of them.
Other Useful Tips:
Make your nav plans easy to follow by using the landscape instead of breaking your route down into arbitrary bearings. Eg: go straight up/down a slope, sidle at a constant height, or use handrails (like troughs, the base of cliffs, the edge of a terrace, etc).
Each nav leg should have known (1) Direction*, (2) Distance, (3) Height change, (4) Time required, and (5) How will you know when you’re there? (#5 is key – if you don’t have an easy method, consider changing your plan)
*Direction doesn’t have to be a bearing – it can simply be following a handrail.
How to remember those five items?
- Don’t Head Down That Hill
- Downhill Doesn’t Help Tired Hikers
- Dr Dre Hates The Hills
Many features that seem significant in the landscape may hardly show up on the contour lines. This effect is exacerbated in the mist or in the dark.
In bush, some major features like bluffs and deep gullies are sometimes not shown in the contour lines at all. This is because the contour lines are usually based on aerial photos of the bush canopy, which often grows surprisingly uniformly over a very uneven forest floor.
When sidling, you’re moving exactly parallel to the contour lines; going straight up or down is moving exactly perpendicular to the contour lines.
If you know you need to follow a particular bearing which will take you diagonally up or down a slope, you can use the slope itself as your bearing reference. E.g. If straight downhill is a bearing of 50 degrees and you want to follow a bearing of 80 degrees, just keep aiming roughly 30 degrees to the right of straight downhill. You can do this visually, without a compass, and it can save a lot of time. Be careful using this method on slopes that aren’t uniform.
When going diagonally up or down a slope, it’s usually easy to tend more straight up or down than your intended path, so go slightly more horizontal than you think you need to.
Short and Sweet:
Below the snowline, if there’s “space to draw another contour”, it’s generally travellable, but not necessarily easy.
Always take a hard copy map and a compass – your phone could die or be dropped.
Use .gpx files with caution:
- Conditions could be different (eg how thick was the snow cover? How open were the crevasses? How dry vs slippery was it for the other person?)
- Did the person who created the .gpx file actually follow a good line in the first place?
- Following a .gpx takes your attention away from your surroundings
Always keep an eye on where you are on the map, so that you don’t have to figure it out from scratch.
Improve your skills by trying to guess your location on the map frequently on your trips, then turn on location on your phone to see how close you were.